Winding roads, big views, and turtles in one day.
This Circle Island tour strings together Oahu’s coastlines, volcanic lookouts, and a peaceful stop at Byodo-In Temple—plus a North Shore rhythm that feels a little more local than the usual Waikiki loop.
What I like most is the mix of calm and energy: the temple grounds give you a real breather, and the North Shore part of the day is built around food and sea life (including a chance to spot honu, Hawaiian green sea turtles). The other thing I really appreciate is the value in the way the day is planned: you get guided transport, a professional host, and temple admission covered, while most other stops are photo and scenery stops.
One thing to consider: the schedule is busy, with lots of short stops and some time tied to tasting and buying at roadside shops. If you hate shopping stops or want hours on one beach, you might feel the day runs a bit fast.
In This Review
- Key highlights worth planning for
- 7am Waikiki pickup: a fast start, then you’re out the door
- Kapiʻolani Park and the Waikīkī Aquarium area: a local intro to Diamond Head
- Diamond Head viewpoints and the Amelia Earhart connection
- From Koko Head to Hanauma Bay: volcanic drama before the ocean turns quiet
- Halona Blowhole and Halona Cove: when the surf is doing the work
- Sandy Beach, Waimānalo, and Rabbit Island: big waves, then quieter views
- Byodo-In Temple: the calm stop that makes the whole day work
- Koʻolau drive and Tropical Farms tastings: coffee, nuts, and quick culture flavor
- Kualoa Regional Park: Chinaman’s Hat and Jurassic Valley views from the road
- Lāʻie Hawaii Temple drive-by: one more spiritual pause
- Kahuku Farms lunch: the garlic shrimp plate decision (cash needed)
- North Shore fruit stand, then Sunset Beach: cooling down before the ocean spectacle
- Pipeline Beach, Sharks Cove, and Laniakea: the ocean hits different here
- Pua’ena Point turtle viewing: your best chance on the schedule
- Dole Plantation and the return toward Honolulu: souvenirs plus one last island punch
- Price and logistics: is $146 a good deal for one full day?
- Should you book this Oahu Circle Island with Byodo-In Temple?
- FAQ
- What time does the tour start?
- How long is the tour?
- How much does it cost?
- What’s included in the price?
- What do I need to pay for separately?
- Do I need cash for lunch?
- Is admission to Byodo-In Temple included?
- Can I expect to see turtles on this tour?
- What language is the tour offered in?
- What if weather is bad?
- What is the cancellation policy?
Key highlights worth planning for
- Byodo-In Temple included: koi carp, wild peacocks, reflecting pond, and quiet meditation niches
- North Shore turtle attempt: time on turtle-frequenting beaches like Laniakea and Pua’ena Point
- Food built into the route: Kona coffee and macadamia tastings, then North Shore garlic shrimp for lunch
- East-side viewpoints and movie coast: Diamond Head, Halona Blowhole, and Halona Cove filming scenery
- A full-day overview: drive-by context for places you may want to revisit on your own
7am Waikiki pickup: a fast start, then you’re out the door
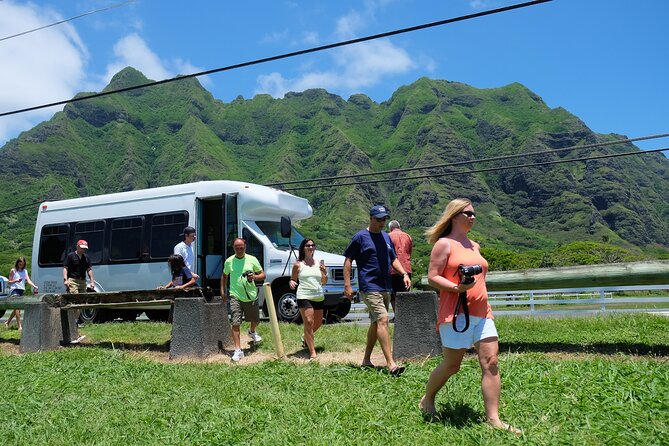
Your day kicks off at 7:00am with a Waikiki pickup. You’ll board a semi-private shuttle in an air-conditioned vehicle, guided by a host who stays with your group as you cross the island loop. Hotel pickup times can vary, and they’re assigned when you book—so do yourself a favor and double-check your exact pickup window once your confirmation comes through.
This is one of those trips that works best when you treat it like a guided whirlwind. You’re not meant to “hang” in one spot for hours. You’re meant to get oriented fast, see the big scenes, and leave with a clear list of what you want to do again later.
You’ll also be in good company size-wise. The tour runs with a maximum of 40 travelers, which helps keep things from feeling like cattle at every stop (even though it still is a day tour).
You can also read our reviews of more tours and experiences in Oahu.

Kapiʻolani Park and the Waikīkī Aquarium area: a local intro to Diamond Head
The early drive takes you through Kapiʻolani Park, Honolulu’s oldest and largest public park. It’s the kind of place that makes the island feel lived-in: banyan trees, open fields, and a view of Diamond Head in the distance. It’s also a great setup for what comes next, because you’ll be seeing Diamond Head repeatedly from multiple angles.
You’ll also pass along the Waikīkī Aquarium area, founded back in 1904. You’re not being dropped off for a long visit here, but the “marine research center” angle matters—especially once the day shifts toward bays and snorkeling zones later.
Diamond Head viewpoints and the Amelia Earhart connection
The Diamond Head stop is all about seeing the crater country from the right elevation. You’ll go to an elevated lookout perched on the eastern side of Waikiki’s famous volcano, and from there you can frame the south and southeast coastline in photos. On clear days, the views stretch farther than you’d expect.
The lookout is also tied to Amelia Earhart. The spot is known as the Amelia Earhart Lookout, the place where people gathered to watch her first solo aviation journey from Hawaii to North America. It’s one of those “wait, that’s here?” history moments that turns a scenic view into something you can actually explain to friends later.
If you’re into photography, this is where you’ll want to be ready. The stop is short, and good angles depend on moving quickly and getting your timing right.
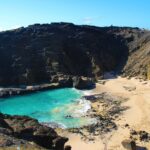
From Koko Head to Hanauma Bay: volcanic drama before the ocean turns quiet
As you head along the east side, the drive-by emphasis starts to make sense. Koko Head appears as a volcanic crater with a rugged ridgeline and the famous hiking trail climbing up its side. Even if you’re not hiking it today, it’s visually powerful—Oahu’s volcanic story is right in your face.
Then comes Hanauma Bay. You’ll get a view of the crescent-shaped bay and the marine sanctuary vibe from the lookout area. The water clarity and coral reefs are the headline here, and the main value of this stop is setting expectations for how different Oahu looks when you shift from “beachfront strip” to “protected marine wonder.”
Real talk: you don’t have time to do Hanauma Bay like a dedicated beach day on this route. Today is about seeing enough to decide whether you want to come back and plan a full swim/snorkel day.
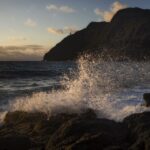
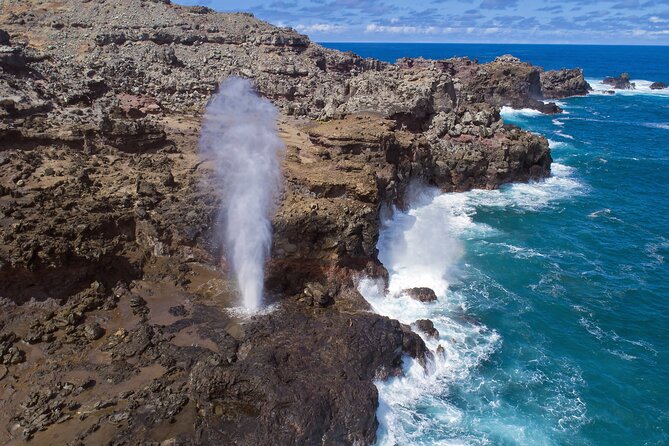
Halona Blowhole and Halona Cove: when the surf is doing the work
Next up is Halona Blowhole, a natural “Hawaiian geyser” powered by waves and lava geology. Water pressure builds inside a lava tube, and when surf conditions are right, it erupts through a narrow opening. Timing is unpredictable because it depends on the ocean, but that unpredictability is also part of the fun.
Right after that, you’ll look toward Eternity Beach, also known as Halona Cove. This is known for a well-known movie filming location (From Here to Eternity). It’s not just a trivia stop—the beach scenery is stunning, with rugged lava cliffs framing the sand and turquoise water.
Short stops can feel rushed, but in a day like this, these are exactly the kinds of “see it once with context” moments that you can’t replicate from your hotel.

Sandy Beach, Waimānalo, and Rabbit Island: big waves, then quieter views

Your route continues past Sandy Beach, famous for its powerful shore break and bodysurfing energy. If you’re not a strong swimmer or you’re not there to watch from a safe distance, you’ll still get the feel of why this coast is built for surfers—especially when the ocean is pushing hard.
Then you swing toward Waimānalo, where the coastline changes character. You’ll see dramatic sea cliffs and a wider expanse of windward water. The scenery also includes a view of Manana Island, nicknamed Rabbit Island due to its shape. This is one of the “less crowded” feelings you’ll notice as you move from the busy south toward windward calm.
If you’ve only seen Oahu from Waikiki, these windward views are what help the island click. You start seeing patterns: where cliffs rise, where water opens, and where the island feels more like a natural shoreline than a resort strip.
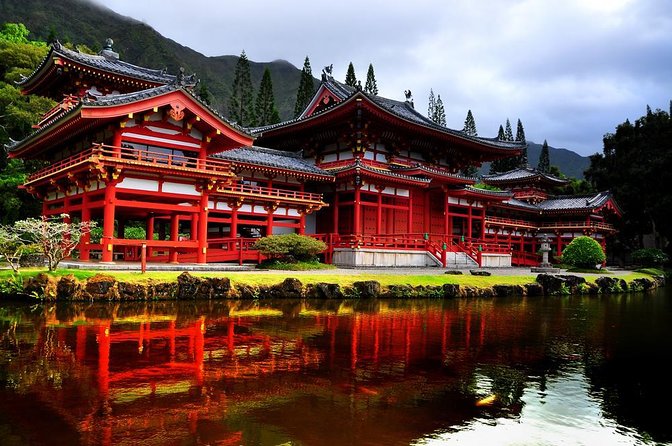
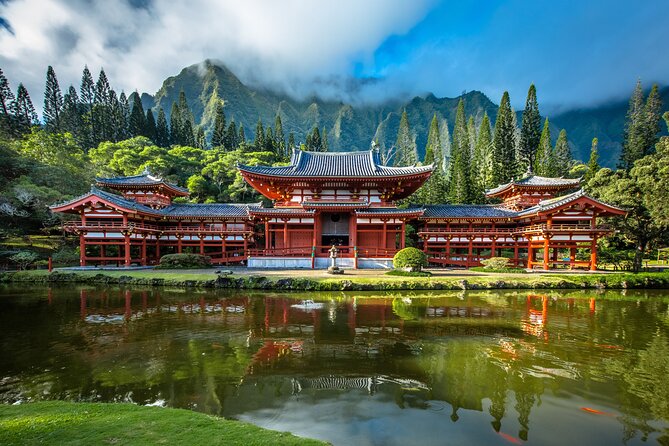
Byodo-In Temple: the calm stop that makes the whole day work
This is the moment many people are waiting for, and for good reason. Byodo-In Temple sits in a cleft of the pali, tucked into landscaped grounds with wild peacocks roaming around and hundreds of koi carp in the reflecting pond area. You’ll also notice meditation niches and small waterfalls, all designed to slow your pace.
The best thing about this stop is that it’s not trying to be another “quick photo” moment. Even though the scheduled time is about 30 minutes, the space encourages a pause. It’s the kind of place where you naturally look around instead of checking a clock.
Temple admission is included in the tour price, so you’re not juggling extra tickets during the day. It also means you can focus on the experience rather than logistics.
Practical tip: wear shoes you can walk in comfortably. The grounds are mostly easy walking, but you’ll want grip on any uneven spots.
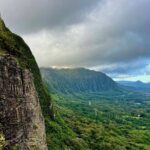
Koʻolau drive and Tropical Farms tastings: coffee, nuts, and quick culture flavor

As you head from the temple area back toward the east-side farms, you’ll get views of the Koʻolau Mountains, a volcanic range that stretches along the windward coast. From the road, it reads as steep cliffs covered in greenery—another reminder that Oahu is basically a living geology textbook.
Next comes the stop at Tropical Farms (the Macadamia Nut Farm Outlet). This is a tasting-and-shopping stop, and it’s here to break up the long drive. You’ll sample macadamia nuts and Kona coffee, plus Hawaiian chocolates. It’s not a museum, so keep your expectations simple: you’re sampling and browsing, and you’re deciding if you want souvenirs.
This is also where you’ll want a little self-control. If you love tasting treats, you’ll probably have a great time. If you’d rather spend that time at the beach, just treat it as a quick stop and don’t get trapped browsing for an hour.
Kualoa Regional Park: Chinaman’s Hat and Jurassic Valley views from the road
After that, the tour moves into the Kualoa area, where film history is part of the landscape. You’ll see Chinaman’s Hat (also called Mokoliʻi) sitting near the Kualoa Valley mountain range. It’s a dramatic profile and a filming location for lots of Hollywood productions, including Jurassic Park. The nickname comes from its resemblance to straw hats worn by Chinese immigrants who worked the island’s sugar plantations in the early 1900s.
Then you’re in the Kualoa Private Nature Reserve area, often referred to as Jurassic Valley. The idea here is to show you the cliffs and open valleys that made producers fall in love with this scenery. You’re not doing a guided hike in the reserve today, but the drive-by views give you a “wow, now I get it” reaction.
You’ll also pass Kahana Bay & Valley, where the focus is Hawaiian cultural roots and ancient settlement areas, including historic taro terraces. Even from the road, it adds depth to the day beyond just beach scenes.
Lāʻie Hawaii Temple drive-by: one more spiritual pause
On the way toward lunch, you’ll pass the Lāʻie Hawaii Temple, the first Latter-day Saints temple built in the Pacific. You’ll see its white facade against gardens and palm trees. It’s a calmer, architectural contrast to the ocean-and-volcano stops.
This matters because it breaks the pattern of “just drive, just stop, take photos.” You get a different kind of visual: symmetry, grounds, and a place that’s meant for quiet reflection.
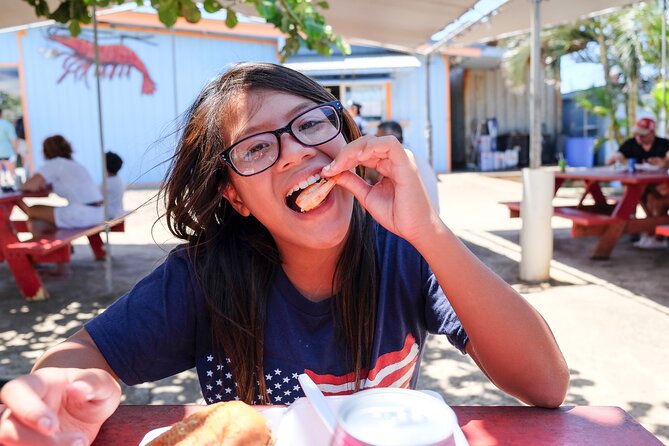
Kahuku Farms lunch: the garlic shrimp plate decision (cash needed)
North Shore time hits around lunch at Kahuku Farms. This is your main meal break, scheduled for about 40 minutes. The menu highlight is a famous North Shore garlic shrimp plate. There are also non-shellfish and vegetarian options available, so you’re not locked into seafood.
One important detail: you should bring cash for lunch. That’s not just a “might be useful” tip—it’s part of how this stop operates.
If you’re food-motivated, this is the place where the day starts to feel worth it. A big tour can sometimes mean bland convenience meals. Here, the lunch choice is built around what the North Shore is known for.
North Shore fruit stand, then Sunset Beach: cooling down before the ocean spectacle
After lunch, the tour pauses at a tropical fruit stand. Expect ice-cold coconuts you can drink from, along with fresh mangos and other tropical treats. It’s quick, but it helps you stay energized for the later beach stretch.
Then you reach Sunset Beach. It’s quieter than Waikiki, but still beautiful in that classic North Shore way. And it comes with a seasonal warning: in the winter months, swells can reach 30 to 40 feet from the safe confines of shore. If you’re traveling in winter, this stop becomes more about watching ocean power than casually relaxing on sand.
Pipeline Beach, Sharks Cove, and Laniakea: the ocean hits different here
The route then goes past Pipeline Beach, home of the world-famous Banzai Pipeline. You’ll see why this coast is taken seriously by surfers. Even when you’re not watching competitions, the ocean shape and energy are obvious.
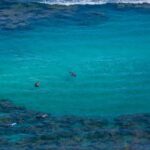
Next is Sharks Cove, known for snorkeling and tide pools made by lava rock formations. The viewing angle is what you get on this tour, not a full swim itinerary—but it’s still useful because it shows you where the marine life concentrates.
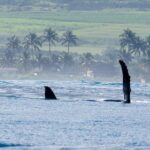
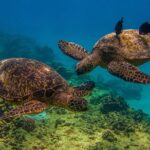
Then comes Laniakea Beach, also called Turtle Beach. This is one of the star moments for sea life. Green sea turtles—honu—are frequently spotted here basking on the sand. The whole point of this part of the day is getting you to the places where honu come up to rest.
Pua’ena Point turtle viewing: your best chance on the schedule
After Laniakea, you get another chance at Pua’ena Point Beach Park. The tour is built around the idea that honu may be seen laying on the sand and basking. There’s no guarantee—turtles follow their own timing—but scheduling two turtle-area stops boosts your odds.
If you’re hoping to photograph turtles, keep your expectations realistic. This is an “observe and be respectful” situation, not a guaranteed photo shoot. Bring sunscreen and stay patient.
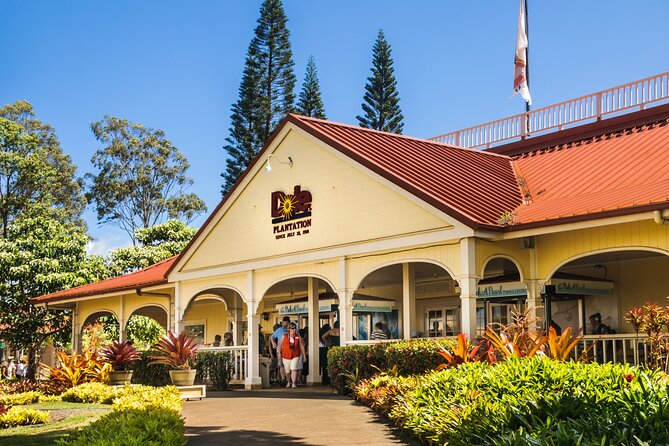
Dole Plantation and the return toward Honolulu: souvenirs plus one last island punch
To close out the day, you end at Dole Plantation. Expect pineapple-themed souvenirs and, most importantly, Dole Whip (pineapple ice cream). The stop is about 30 minutes, so keep it focused: grab your treat, browse if you want, and don’t spend your whole time buried in magnet shopping.
From there, the route includes drive-by moments back toward Honolulu. You’ll pass by Pearl Harbor from a distance, with calm waters and memorials visible. It’s a short look, but it gives the day a heavier historical note after all the scenic focus.
Finally, you’ll head into downtown Honolulu for highlights like ʻIolani Palace (the only royal palace in the U.S.) and the King Kamehameha Statue honoring the ruler who united the islands. It’s a fitting end: the island’s story across nature, culture, and history.
Price and logistics: is $146 a good deal for one full day?
For $146 per person, you’re buying a full-day structure: air-conditioned transport, a professional guide, Waikiki pickup and drop-off, Byodo-In Temple admission included, and a day that covers a lot of geography without you renting a car.
The value shines if you want:
- an island overview fast
- guidance that helps you connect what you’re seeing with context
- included admission for the one major ticket stop on the schedule
Where you might feel less thrilled is pacing. This is not a “linger” tour. Some stops include tasting and buying opportunities, and the day leans toward quick hits. Also, bus comfort can vary by seat assignment in a full day group, so arrive ready for a long but structured ride.
Should you book this Oahu Circle Island with Byodo-In Temple?
Book it if you want a smart, guided way to see east, north, and a good slice of Honolulu in one day. I’d especially recommend it if you’re short on time, don’t want to drive around the island, or you want a temple stop that actually offers a quiet break from constant ocean viewpoints.
Skip it or think twice if you want long beach time, hate shopping/tasting stops, or you get cranky when schedules are tight. You’ll still see a lot, but you won’t control the pace.
If you pick the tour, do two things for the best experience: wear comfortable walking shoes for temple grounds and turtle-beach areas, and bring cash for lunch so you’re not scrambling mid-day.
FAQ
What time does the tour start?
The tour start time is 7:00am, with Waikiki pickup at that general time.
How long is the tour?
The duration is about 9 hours (including travel time between stops).
How much does it cost?
The price is $146.00 per person.
What’s included in the price?
Included items are an air-conditioned vehicle, a professional guide, Waikiki pickup and drop-off, and admission to Byodo-In Temple.
What do I need to pay for separately?
Lunch and other guest spending are not included, and you should bring money for food and drinks.
Do I need cash for lunch?
Yes. The lunch stop notes that you should bring cash.
Is admission to Byodo-In Temple included?
Yes, admission to Byodo-In Temple is included in the tour price.
Can I expect to see turtles on this tour?
You visit turtle-focused areas such as Laniakea Beach and a beach stop at Pua’ena Point Beach Park, where the goal is to spot Hawaiian green sea turtles (honu). Sightings are not guaranteed, but the tour is designed around that chance.
What language is the tour offered in?
The tour is offered in English.
What if weather is bad?
The experience requires good weather. If it’s canceled due to poor weather, you’ll be offered a different date or a full refund.
What is the cancellation policy?
Free cancellation is available up to 24 hours in advance for a full refund. If you cancel less than 24 hours before the start time, the amount paid is not refunded.